


![]()
Elyse Help
Index
|
|
Elyse is a tag-based file management system. Tag-based file management solves the major problem with traditional methods of managing large numbers files on computers: paths and folders. Storing files in Elyse eliminates the need to decide precisely where to store a file, or to subsequently find where it was stored. Any logical method of grouping and arranging files can be used. In short, you the user are given the power to impose your own logic, and change your mind as often you like with just a few clicks.
The concept of folders and directories is replaced in Elyse by tag nodes. Each node is somewhat like a saved search. Nodes are arranged in trees and give a similar effect to that of folders and directories. The difference is that the trees can be rearranged without any impact on how the files are stored or what tags are associated with each file. The same copy of one file can simultaneously appear in multiple overlapping groups of files, each group represented by a node. For example, you might have a photo of the family at the beach while on holidays. The same one file in Elyse can appear in a list of last summer's holiday photos and also in a list of photos of family members.
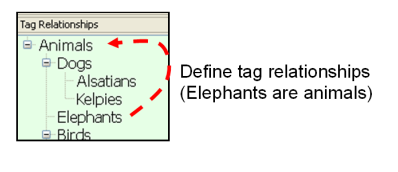
Elyse also recognises that relationships exist between tags. For example: lions, ostriches and elephants are all animals. By creating a tag relationship structure to define these relationships it becomes possible to instantly create a list of all files that have an animal type tag associated with them. There is no need to attach the tag animal to every file about an animal.
Assigning tags to files in Elyse is easy and very powerful. Many files can be individually linked with multiple tags in a single drag and drop action. Similarly, multiple tag-file associations can be removed via a single dialog box.
There are some things you should know about Elyse before you start.
1. Elyse databases can be either local or server based. An Elyse local database is a single file. The maximum size of that file is determined by the operating system and file system. For example, if the file system is FAT32 then the maximum file size will be 4GB. External hard drives will often be supplied pre-formatted in FAT32 because it can be universally written to by both Windows and Mac. It is recommended that any hard drives you use be formatted in NTFS or Mac OS Extended.
2. An Elyse database is platform-independent. That is, an Elyse database containing internal files created with a Windows computer will be able to be used on a Mac computer and vice-versa. (Note however that there are compatibility restrictions for writing to an NTFS formatted drive from Mac and when writing to a Mac OS Extended formatted drive from Windows.)
Elyse supports two different types of databases: Local and Server. Local databases are created automatically by Elyse and are stored as a single .ely file. Local databases are only suitable for single user application. For multi-user application a server database must be created. Elyse can connect to a Postgre database server hosting an Elyse database.
Setting up a Postgre server and Elyse multi-user database requires some basic database administration skills.
After installing Postgre, load the script Create_DB.sql to create the database. (The script file can be found in the folder where Elyse was installed.)
For example: psql --dbname=elysedb --username=postgres --file="C:\Program Files (x86)\Elyse\Create_DB.sql"
A separate script file Create_User.sql has also been provided to assist with creating users. Edit the user details in this file as required.
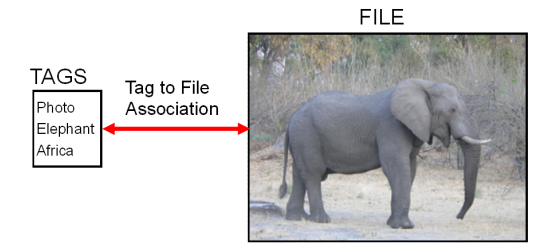
Files can be associated with tags.
It is possible to define relationships between tags.
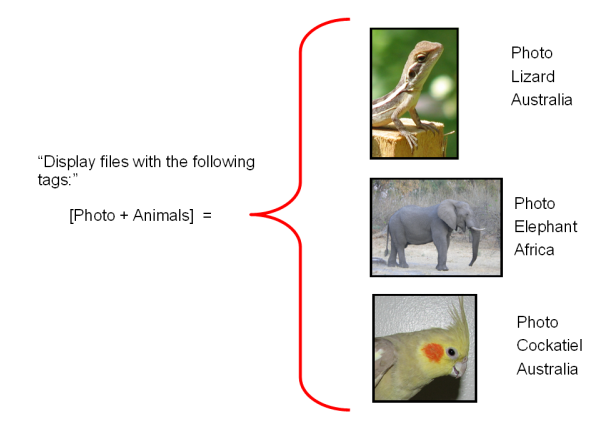
Tag relationship definitions are taken into account when displaying groups of files.
With a local Elyse database the files can be stored in one of two ways:
External to Elyse, linked to an Elyse database from any folder, and
Internally within an Elyse local database, which itself is a single file.
When files are stored external to Elyse, whether the files are all stored in a single folder or in multiple folders is transparent to the way the files are managed and viewed within Elyse. The main advantage of externally stored files over internally stored files is that they are able to be modified by other applications.
Files stored internally within Elyse are all stored together within a single Elyse database file. This has the advantage that the database to file link cannot be broken. The database, together with all the contained files, is also very portable. Files can be viewed by an external application launched via Elyse but are not able to be stored back into the database from an external application. This does mean however that files within Elyse are also secure against inadvertent change.
When files are dragged into the database the
setting of the ![]() toggle button determines whether the files are
linked as external files or copied into the Elyse database as
internal files.
toggle button determines whether the files are
linked as external files or copied into the Elyse database as
internal files.
Externally linked files are indicated by the
link icon 
Files may be transferred from externally linked files to internal stored files by right clicking on the file or files and selecting Transfer to Internal.
Files can be added to Elyse by more than one method.
1. Select the All files or any other Browsing Node.
2. Select the Add Files icon
3. Browse to the file or files to add
4. Select Open
Alternative Method:
1. Open your usual file browser (Explorer or Finder)
2. Select the files to add and drag them to the All files Browsing Node (or a different node), or to a tag in the Tags Dock
Files can also be dragged from the External Files dock.
The setting of the ![]() toggle button determines
whether the files are linked as external files or copied into the
Elyse database as internal files.
toggle button determines
whether the files are linked as external files or copied into the
Elyse database as internal files.
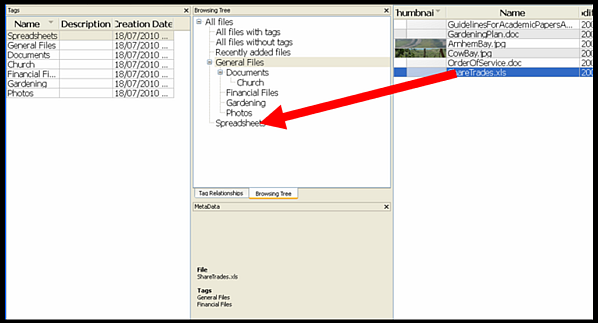
Providing a Browsing Node has already been selected, files can be dragged to the Main View.
Note the following:
The files will be assigned the tags which correspond to the currently selected Browsing Node.
If Duplicate Management is turned on Elyse will detect and manage duplicate files.
If a folder is dragged from an external browser or from the External Files dock and Automatic Tag Creation is turned on, Elyse will automatically create and assign tags to files and automatically create Browsing Nodes corresponding to the folder names.
Caution: If storing files internally within Elyse ensure you have enough disk space for the .ely Elyse database file.
To create tags:
1. If the Tags dock is not visible select View > Show All Docks, or right click on the tool bar and check Tags.
2. Select the New Tag button
3. Type in the details of the new tag
4. Press Enter
To create multiple tags in succession toggle
the Edit Mode button ![]() on and then select the New Tag button.
on and then select the New Tag button.
Under Edit > Preferences check the box beside Enable auto-tag-creation from folders. The option is selected by default.
When a folder is dragged into Elyse from an external browser or from the External Files dock, tags will be automatically created corresponding to the folder names. If a tag already exists which is identical to the folder name then a duplicate tag will not be created.
To edit a tag:
1 . Select the Edit Mode toggle button
2. Double click on the tag in the Tags dock .
3. To turn off the edit mode click on the Edit Mode toggle button again.
To delete a tag select the tag and press Delete, or right click and select Delete Tag. If the tag is assigned to a file or is used in a Browsing Node or a Tag Relationships tree the option will be presented to cascade delete these associations. Note that cascade deleting tag associations does not delete files.
File names may be edited in the same way.
To assign a tag to a file or group of files drag the file or files to the tag in the Tags dock. Tagging can also be achieved by dragging a tag or tags to a file.
Alternatively, drag the file or files to a Browsing Node. Note that all the tags associated with the Browsing Node will be assigned to the file or files. The file-tag associations will remain even if the Browsing Node is later deleted.
Tags may also be assigned to files by selecting one or more tags in the Tags dock and dragging them to a single file in the Main View.
To assign multiple tags to multiple files without using the Browsing Tree, do the following. Multi-select the desired files. Multi-select the desired tags. Then select File > Link Tags to Files.
File-tag associations may be deleted by right clicking on the file or group of files and select Tags > File Tags. A dialog box will show any tags linked to any of the files selected. Check boxes with a tick indicate a tag which is associated with all of the selected files. Check boxes which are not ticked indicate tags which are associated with only some of the selected files. Deselect or select check boxes according to what tags you want to assign or remove from all of the selected files. Then press OK.
Selecting a file or group of files and pressing Delete will delete the file-tag association for the single tag displayed for the Browsing node which has been selected. Alternatively select File > Remove From Node. Note that the file or files will disappear from the Main View, however the files have not been deleted -- only the file-tag association has been removed. The file or files will still appear in the All files view.
If Automatic Tag Creation is enabled, the automatically created tag will be assigned to the files which were in the folder from which the tag was created. If Duplicate Management is also enabled, files which have identical content will have tags assigned to them corresponding to all the duplicate files, even though the duplicate files will be ignored.
The tags assigned to a file are listed in the Metadata dock when a file is selected.
Tags can also be linked or unlinked to a file or group of files by the following method.
All tags which appear in the Browsing Tree will be listed. Check or uncheck tags to link or unlink them to all of the selected files. Tags which are only linked to some of the files will be indicated with shaded boxes. Inherited tags and also tags which are linked to the selected file or files but which are not in the Browsing Tree will not be displayed.Select a file or group of files. Right click and select Tags > Browsing Tree Tags. Check or uncheck check boxes to link or unlink tags to files.
When the number of tags in a database becomes large it is useful to be able to create groups of tags. Note that tag grouping is not the same as tag relationships. Tag grouping only affects the way in which tags are displayed.
To create or edit tag groups select Edit > Tag Groups from the menu bar.
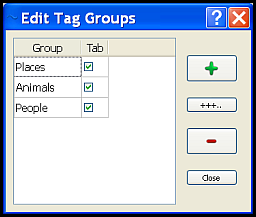
Press ![]() to add a new tag group. Toggling
to add a new tag group. Toggling ![]() allows multiple tag groups to be created
in succession by pressing the Enter key.
allows multiple tag groups to be created
in succession by pressing the Enter key.
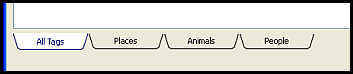
Tag groups which have the Tab check box checked will appear as tabs at the bottom of the tag list.
Assigning Tags to Tag Groups
Tags may be assigned to tag groups by one of the following methods.
Select one or more tags, and then right click and select Assign Tag Groups.
Select one or more tags, and then from the menu select Tag > Assign Tag Groups.
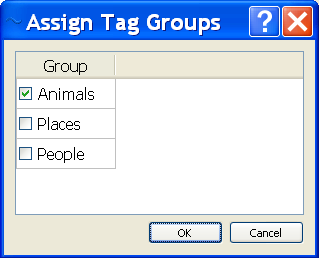
Tags may also be assigned to a tag group by dragging the tag or tags to a tag group tab. A tag may be assigned to more than one tag group.
Groups of files can be created in a number of ways.
Via the Browsing Tree.
By performing a Search.
Via the tag list in the Tags Dock.
By dragging one or more tags to the Tag Requirements Bar 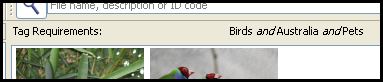 .
.
To assist with narrowing down a query select the tab under the Tags Dock labelled D-Tags. This tab lists only tags which are associated with at least one but not all of the files.
To display files with the same tags, right click on the file and select Show similar files. Note that defined Tag Relationships will be taken into account.
To view all files in the database select the All files node on the Browsing Tree.
The list of files will be displayed in the main view.
The File Search Field is
located on the right hand side of the tool bar and is toggled on
and off by pressing the search button. ![]()
Type in a search string and press Enter.
The search will search the file names, descriptions and the file ids.
Files can be copied from Elyse by the following methods.
1. Select the file or files to be extracted.
2. Select the Extract Files icon
, or right click and select Extract Files
3. Browse to the folder to add the file to.
4. Select Ok
Alternative Method:
Drag the selected file or files to the External Files dock.
The Tags dock is usually located on the left hand side. If it is not visible select View > Show All Docks, or right click on the tool bar and check Tags.
To display all of the files associated with a particular tag, ensure that edit mode is not selected and double click on the tag. Alternatively, select the tag and press the Tab key.
To display all of the files associated with
more than one tag, multi-select the
tags and then press the Tab key or the ![]() button.
button.
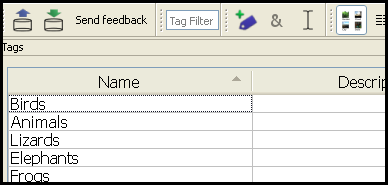
Type into the Tag Filter field to filter the displayed list of tags.
To hide all of the tag list columns except for the Name column, right click on a column heading and check the Hide all columns except Name option.
The Browsing Tree tab is usually located in the middle of the screen. If it is not visible select View > Show All Docks and select the Browsing Tree tab.
Each node of the Browsing Tree is referred to as a Browsing Node. Each Browsing Node effectively represents a logical AND group of the tags above it.
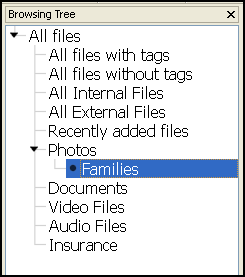
In the example below, the selected node represents the tags Photos and Families. A file dragged to this node will be assigned both of those two tags. When the node is selected, the main view will display all files which have both of those tags.
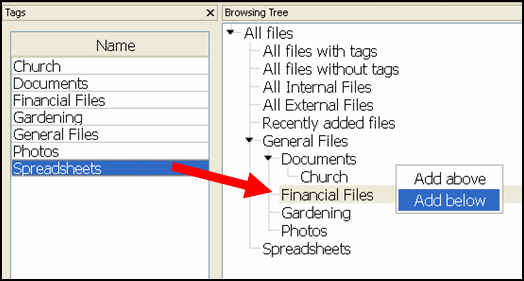
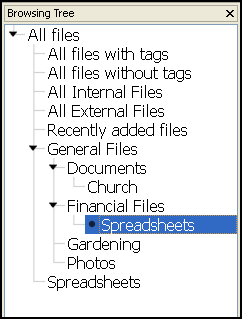
To add a new node to the Browsing Tree drag a tag from the Tags dock to a node on the tree and select Add above or Add below as applicable. This Add above or Add below feature may be turned of under Edit > Preferences, in which case nodes will be always added below.
At the top of the Browsing Tree display are six fixed special nodes:
- All files
- All files with tags
- All files without tags
- All internal files
- All external files
- Recently added files
Adding files when the All files node is selected will add the files without assigning any tags. Files may not be dragged to the other fixed nodes.
When a database is initially opened, no nodes are selected by Elyse. If the database contains files then select a node to display files.
The list of files displayed when a Browsing Node is selected is extended by Tag Relationships. Hence if files are displayed which do not have any of the tags applicable to that node it will be because there are Tag Relationships which have been set.
Creating or changing browsing nodes does not alter tag-file associations or Tag Relationships.
Multiple Browsing Trees can be created in server databases by selecting Edit > Browsing Tree List. This allows different users of the same database to customise their own Browsing Tree.
Browsing Tree Arrangement
To change the way in which the Browsing Tree is displayed select Edit > Preferences > Browsing Tree. Select between Alphabetical Order or Manual. If Alphabetical Order is selected the Browsing Tree branches will be arranged in alphabetical order. If Manual is selected then Browsing Tree branches can be dragged to different positions on the same level.
In Manual mode the order of the arrangement of nodes can be changed by dragging and dropping however the structure of the tree cannot be changed in this way, only the way it is displayed.
The default preference setting is Manual.Browsing Trees In Server Databases
Server databases support multiple Browsing Trees so that, for example, each user can have their own customised Browsing Tree. Select Edit > Browsing Tree List. Create, edit or delete Browsing Trees from this table and select which one to display. The first item in the list is the default, which can be renamed but cannot be deleted.
To exclude files with a particular tag from a group do the following.
1. Drag the Tag to the applicable branch of the Browsing Tree to create a new Browsing Node.
2. Right click on the Browsing Node and select Tag Requirement Inverted. The tag representing the Browsing Node will now be displayed with a dash before it.
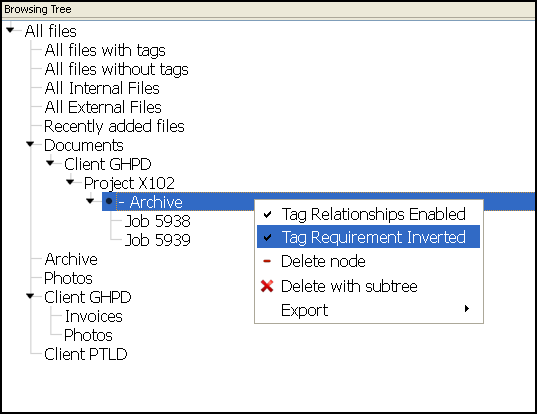
In the above example, if the Job 5938 Browsing Node is selected, any files dragged to the Archive node below will disappear from the Job 5938 node once the main view refreshes. This is because they will be assigned the Archive tag, and the Job 5938 node is on a branch which excludes files with the Archive tag. Conversely, any files dragged from the Archive node to the Job 5938 node will disappear from the Archive node because the Archive tag will be removed at the same time as the Documents, Client GHPD, Project X102 and Job 5938 tags are added.
A Browsing Node can be linked to a
folder such that whenever a file is added to that folder it will
automatically be linked to Elyse and assigned the tags represented
by that Browsing Node.
Select a Browsing Node. Select Node
> Auto Link to Folderor right click and select Auto Link to Folder. Browse to the folder andthen press Ok.
For each browsing node which has auto
linking associated with it the tag representing that node will be
displayed in blue text.
To remove auto linking from a node select Node > Auto Link to Folder, or right click and select Auto Link to Folder, and then press Remove. The files that are already linked will remain linked but Elyse will ignore new files added to that folder.
To view which folder is linked to a node, Node
> Auto Link to Folder, or right click and select Auto Link to Folder, and then select View Path.
A single folder can be auto linked to more than one Browsing Node but a single Browsing Node can only be linked to one folder. Auto Linking will ignore sub folders.
If a parent node above an Auto Linked Node is modified then the list of auto link tags will be
changed accordingly but the new tag list will only be applied to
new files as they are linked. If the
tag representing a node is moved by dragging then the auto linking
will move with it. The list of
tags to be auto linked will be those represented by the new node.
If the tag representing a node is
deleted then the associated auto linking will be deleted also.
If the path to a folder becomes invalid,
because the folder has been renamed for example, then any
auto linking related to it will be lost and Elyse will
automatically clear the auto links when an
attempt is next made to access the invalid path. The files will
still be flagged as missing files
however.
Inverted tag requirementsat a Browsing Node
will be ignored when tags are assigned to files
linked to a node. This means that if the same folder is linked to
two different Browsing Nodes,
one of which has a tag requirement inverted and the other has the
same tag but not inverted, then
the auto-linked files will only appear at the node with the tag
which is not inverted.
By default Elyse will auto link files at the time when they are added to an auto linked folder. Each time Elyse is launched each auto linked folder will be checked for new files. These options can be changed under Preferences > Auto Linking. If a file cannot be read for some reason, or if it is a duplicate file then dialog boxes will be displayed accordingly.
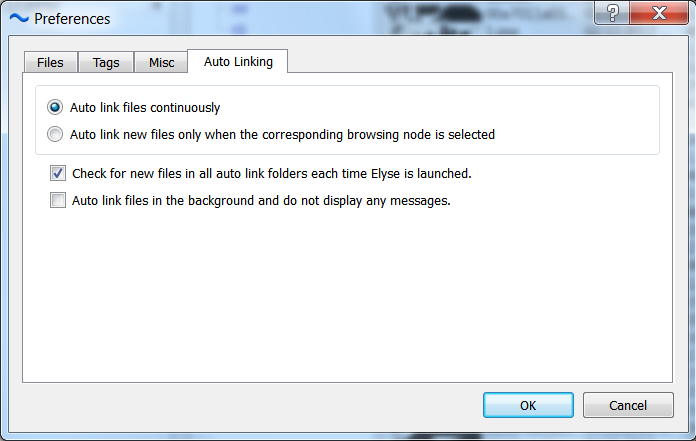
To turn off all messages during auto linking
check the preference to auto link in the background.
Note that if this preference is selected it will override the
Duplicate Management preferences for
listing duplicate files and presenting file name duplicates for
files that are linked by auto linking.
The Tag Relationships tab is usually located in the middle of the screen. If it is not visible select View > Show All Docks and select the Tag Relationships tab.
The Tag Relationships display is for defining parent-child relationships between tags. It has a green background to reduce confusion with the Browsing Tree. A child tag in a Tag Relationships tree inherits all the parent tags above it, but the inherited parent tags are not actually linked directly to files through the creation of this relationship. Each node of the Tag Relationships tree effectively represents a logical OR group of the tags below it.
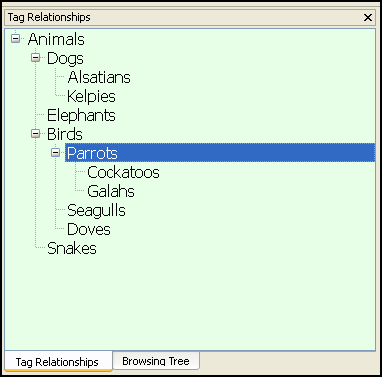
In the example above, any file that is assigned the tag Parrots will also inherit the tags Birds and Animals but not the tag Cockatoos. The Birds and Animals tags are not actually directly linked to the file. They are only linked via the Tag Relationships tree and only while it defines those relationships.
Browsing Nodes are set by default to include all child tags defined in the Tag Relationships tree. To turn off the tag relationships for a particular Tag Browsing Node right click on the node and de-select Tag Relationships Enabled. Hence, for the above example, for a tag browsing node Animals, files with the tag Cockatoos but not Animals would be listed as well as files only having the tag Animals. If the tag relationships are disabled for that node then only the files which have the tag Animals will be displayed.
Creating or changing tag relationships does not alter tag-file associations or the Browsing Tree.
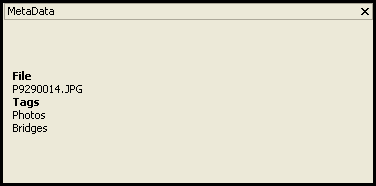
The Metadata dock displays the file name and tags associated with a selected file. It is usually located in the lower centre. If it is not visible select View > Show All Docks, or right click on the tool bar and check Metadata.
The Main View is where files are displayed. It is usually on the right.
Files may be displayed in List view or Thumbnails view form by selecting the
corresponding button ![]()
By selecting the Edit Mode toggle button ![]() , file names and
descriptions may be edited.
, file names and
descriptions may be edited.
Opening Files. To display the content of a file do the following: Ensure that Edit Mode is not selected. Double clicking on an image file will display a preview of the image with the Elyse image previewer. For other types of files Elyse will launch whatever application is associated with that file type by the operating system, and open the file with it. To view an image file with the associated external application right click on the file and select Open Externally.
A file which is internal to Elyse cannot be saved back to Elyse from an external application -- it can only be saved to a separate folder. The original file within Elyse will remain unchanged. If an externally linked file is opened from within Elyse and saved to its original location then that modified file will still be the one linke to Elyse.
In list mode the columns can be manipulated using common features. In list or thumbnail modes files may be multi-selected using common keyboard shortcuts.
Files are displayed in the Main View according to which Browsing Node is selected and what Tag Relationships are defined. To display all files in the database select the All Files node.
Note that pressing delete after selecting a file will not delete the file. The file will disappear from that view because the file-tag association has been removed. The file will still appear at the All Files node.
Elyse permits duplicate files and duplicate file names. Each file is identified with a unique randomly generated id code comprising four letters and three numbers.
Externally linked files are indicated in
either List view or Thumbnail view by the link icon
For externaly linked files you can go straight
to a folder where the file is located. To do this just make right
click on a file in the MainView and then from the context menu
select 'Show in Explorer' for Windows (or 'Show in Finder' for Mac
OS).
A Load id is an automatically generated sequence number. When a group of files is loaded into Elyse each file in that group is assigned the same Load id.
To display a list of files with all of the tags of a given file, right click on the file and select Show Related Files.
To display an image file do the following:
1. Ensure that Edit Mode is not selected.
2. Double clicking on an image file will display a preview of the image with the Elyse image previewer. To view an image file with the associated external application right click on the file and select Open Externally.
Elyse Image Previewer
To run a slide show of the image files currently displayed in the Main View, open the image with the Elyse image previewer by double clicking on the file. Then select the slide show button at the top left hand corner of the image previewer. The interval between slides can be changed at Edit > Preferences > Misc > Slide show increment time.
To rotate an image file select the rotate right or rotate left buttons at the top left hand corner of the Image Previewer. If the Auto-save rotated images preference is selected then the rotated image will be automatically saved. If the preference is not selected then the rotation can be saved by selecting the Save changes button.
Deleting Files and External File Links
To delete an internal file or files from Elyse, right click on the file or files and select Delete File. Note that deleted files cannot be recovered.
When files are deleted from a local Elyse database the space is freed up in the database but the database file size is not reduced. The space is kept available to be used next time more files are added.
The link to an external file may be deleted by right clicking on the file and selecting Delete Link from the context menu. External files cannot be deleted from within Elyse.
If a group of files is selected which contain both internal and external files, the internal files and the external file links will be deleted but the external files themselves are not deleted.
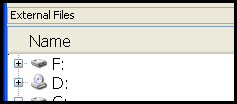
The External Files dock is usually displayed at the bottom. If it is not visible select View > Show All Docks, or right click on the tool bar and check External Files. It can be closed by pressing the cross at the top right hand corner of the dock.
Creating and Saving the Database
If the previous database used was a local database Elyse will automatically open the last database used. To create a new local database select Database > New Local Database. To open a local databse select Database > Open. To connect to a server database select Database > Connect.
Elyse operates directly from the disk therefore it is not necessary to save. The database is always in a saved state.
See Local and Server Databases for information about creating a server database.
When a file is linked to Elyse the file is linked via the path name, e.g. C:\Users\Bob\Documents\Reports\Proposal1.docx. This is an absolute reference path. If the file is on the same drive as the Elyse.ely database file then Elyse will also store a relative path from where the database file is located. For example, if the database file is located at C:\Users\Bob\Documents\ElyseDatabases then the relative path is ..\Reports\Proposal1.docx.
When a file is listed in an Elyse view then Elyse will check the absolute reference path to see if there is still a file of that name at that path. If Elyse can't find the file at its specified location, or the path is no longer valid, then it will check to see if there is a file of the same name at the location defined by the relative path. For example, if the Reports and ElyseDatabases folders and all associated subfolders are copied or moved to a removable drive at folder F:\Work then the new absolute path for the file is F:\Work\Reports\Proposal1.docx. The relative path however is still the same. If Elyse finds a file of the same name at the relative path then it will update the absolute path reference. If no file is found then it will be flagged as missing.
When Elyse opens a database it checks to see
if the database file is still at the same path recorded
previously. If it is not then it will check the absolute and
relative path for every external file to
establish whether the absolute or relative path reference for that
file is valid and there is a file of
that name at that path. If the absolute or relative path reference
is found to be valid and the other
invalid then Elyse will automatically update the one which is
invalid. If both path references are
invalid or if the file is not found at either path then the file
will be flagged as missing.
These path referencing rules also apply to Auto Linking between Browsing Nodes and folders. The path referencing rules are designed to allow portability of local Elyse databases; they do not apply to server databases.
Set duplicate management preferences by selecting Edit > Preferences > Files Tab. It is turned on by default.
If duplicate management is turned on, when files are added into Elyse a check is made for duplicates. Files will be checked against those already in the database as well as the files in the list being added. A file which has the same content as a file already in the database will be not be added to the database. Where there is a group of files with the same content external to the database which do not match a file already in the database then only one copy will be added. If Automatic Tag Creation is enabled then the tags of duplicate files will all be assigned to the same file in the database.
If Check for and present file name duplicates is checked then Elyse will present files being added which have the same names but unique content. If the option is deselected then Elyse will add the files without asking.
If the content of an external file being added matches a Missing External File then the new file will automatically take the place of the old missing file.
Local Elyse databases may be exported or imported.
To export part of a database:
1. Select either one or more tags and press the Tab key, or select a group of files or a Tag Browsing Node (other than the special nodes).
2. From the menu select Database > Export > Database.
3. Browse to a folder, provide a name for the exported database and select Save.
The files, tags associated with the files, tag browsing nodes, tag relationship trees and tag groups associated with the tags will be exported to a new Elyse database.
The import function merges the imported database into the current database.
To import a database, from the menu select Database > Import > Database. Duplicate management functions the same as it does when files are added.
Shell Databases.
All files within Elyse are fingerprinted to allow fast file comparison. Elyse is able to export part of a database with the file fingerprints but without the file contents.
Let's say that several people have sizeable databases on their computers which have large numbers of files in common. Creating file descriptions and tagging large numbers of files takes time. Hence the work of one person in creating metadata can be shared with other people with the same files without requiring simultaneous access to more than one complete database.
Exporting and importing shell databases works the same as above, with the following exceptions.
From the menu select Database > Export > Shell or Database > Import > Shell.
A database shell import will only import metadata which is associated with files which are common to both the shell and also the destination database.
Exporting CSV Files
A list of files together with all of their metadata and associated tags can be exported to a .csv file.
From the menu select Database > Export > CSV File, or right click on the file or files and select Export > CSV File.
When Elyse encounters a registered external
file but does not find a corresponding file of that
name at the given path Elyse will indicate the broken link in the
thumbnail of the file. 
If the same file is returned to the given folder then Elyse will
automatically update the link next time the Main
View is refreshed with a list containing that file. If
a file of the same name but different content is placed back into
the folder then Elyse will re-create the link to that file and
update the details of that file.
To find missing files select File
> Locate Missing Files, or right click on a file or
files with broken links and select Locate Missing Files.
To find an individual file double click on the file in the list
and browse to a file. Note that finding a file manually
permits any file of any name to be linked in place of the
original.
To automatically search for files, create a list of folders to look in by selecting the Add Folder button. If a file of the same name is found in the folder then the missing file will be removed from the list of missing files. Selecting Ok will implement the change. Where more than one folder has been specified, Elyse will check to see if any of the folders contain the same file as previously registered. If the same file is found in more than one location then Elyse will link to the first one it finds, which will be the folder highest in the list of folders created by the user. Selecting Delete Remaining Links will remove the file links for any files not yet found.
Whenever an external file is displayed in the Main View Elyse checks that there is still a file of that name, size and modification date at the specified path. If a file of the same name exists in the given folder but the size or date is different to that recorded in Elyse then Elyse will automatically update the details of the files and advise the user. Elyse will also carry out a duplicate file check.
The interface of Elyse incorporates features which are common to many applications but which a new user might not be familiar with.
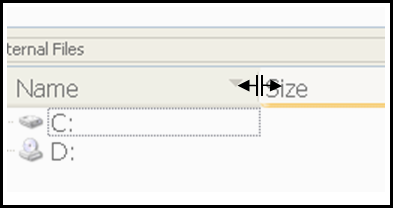
Column widths can be changed by grabbing the line between the columns and dragging it to the left or right.
The order of columns can be changed by grabbing the column heading itself and dragging it left or right.
The sort order of a column can be changed by clicking on the arrow in the column heading.
![]()
To jump down a long list, select the list and press a letter on the keyboard. The list will jump to the first item starting with that letter.
To multi-select a contiguous list of items, select the first item then hold down the shift key while selecting another item. To multi-select non-contiguous items hold the control key down while selecting each item.